ARVATO INSTORE RETURN CENTER
Version 2.3
This document describes the necessary steps for embedding and configuring the Arvato Instore Return Center.
The Arvato Instore Return Center consists of
- a widget, which can be integrated into an HTML / web application
- an authentication provider
- a web API
1. BROWSER SUPPORT
| Browser | Version |
|---|---|
| Chrome | >=85 |
| Safari | >=14 |
| Firefox | >=70 |
| Edge | >=103 |
The widget is also embedded in the browser history, so the user is able to navigate back in the return process via browser navigation.
1.1 Samsung Internet's dark mode is not supported:
Currently, there is no way for developers to provide any custom logic from their end that can bypass Samsung Internet’s dark mode.
For now, if you want your users to use your preferred color scheme, please direct them to navigate to Settings → Labs → and Select “Use website dark theme”. This action will do one of the following:
- If the website supports dark mode, it will be applied (Samsung Internet’s algorithm is not enabled).
- If the website does not support dark mode, then it will be seen in light mode.
2. EMBEDDING THE WIDGET
This section is about how to embed the frontend widget into your web application.
2.1 Referencing the Bundle
The widget itself is a web component and is shipped as a single javascript bundle, which contains all aspects like HTML, Javascript, CSS and fonts. It can be referenced by using one of the following URLs:
| Stage | Bundle URL |
|---|---|
| integration | https://returns.cxc-intg.arvato-scs.digital/<CLIENT>/instore/bundle.js |
| production | https://returns.cxc.arvato-scs.digital/<CLIENT>/instore/bundle.js |
Furthermore a version file gets shipped alongside the bundle file. This plain text file contains the version of the bundle as a string, which can - for example - be used to check the up-to-dateness of the bundle or to display the version in your application for debugging purposes. You can access the version.txt via the following URLs:
| Stage | URL |
|---|---|
| integration | https://returns.cxc-intg.arvato-scs.digital/<CLIENT>/instore/version.txt |
| production | https://returns.cxc.arvato-scs.digital/<CLIENT>/instore/version.txt |
The value for the {CLIENT} parameter is provided by the CXC team.
2.2 Widget Integration
Once the bundle URL of the widget is referenced, it can be used as any other HTML element. Place the tag of the widget: <arvato-instore-returns-widget> at the location where you want the widget to be displayed.
The following code snippet illustrates how the widget can be implemented into a simple web page:
2.3 Widget Element Properties
The widget accepts parameters, which can be passed as HTML attributes:
Keep in mind, that the values of the parameters are only read once the widget gets initialized. Further updates of the values must, if supported, be provided via one of the predefined methods (e.g. via events).
You can find the list of parameters here:
| property | description | required |
|---|---|---|
| storeid | a string, which identifies the given store to the OMS system, which handles the return | no |
| authtoken | used to pass the initial authentication token. See Token Utilization for details | yes |
| lang | defines the language. See Multi-Language Support for details | yes |
| country | specifies the country. See Multi-Language Support for details | yes |
2.4 Multi-Language Support
The widget can be translated in every language. As standard we deliver German and English texts. Further texts can be easily implemented by delivering the corresponding translations.
The default language is predefined in the web component and depends on the individual custom needs. It's possible to individually set the language and the country for the customer by adding the following attributes to the widget element:
| attribute | description |
|---|---|
| lang | defines the language - should be in ISO-639-1 format |
| country | specifies the country - format: ISO 3166 ALPHA-2 |
2.4.1 Usage
2.5 Content Security Policy
If your platform already uses Content Security Policy (CSP), additional rules need to be added. If your platform does not use CSP, these changes are not technically necessary.
Some fonts and images are loaded by the instore widget via data URLs (data:). For that reason you have to adjust the Content Security Policy (CSP) of your web application to allow fonts (font-src) and images (img-src) to be loaded by data URLs.
This can be achieved by providing the corresponding HTTP header:
(if already present it is enough to add the 'data:' source) or by inserting the corresponding HTML meta tags:
3. AUTHENTICATION
Authentication can either be implemented in the Arvato Instore web component internally or be provided externally. The decision on using one or the other depends on several factors and has to be decided together with the CXC-team before implementation.
3.1 Using Integrated Authentication
Once a concept for using the internal authentication and the user-management has been agreed upon and implemented, there are no additional requirements for integrating the widget.
The concept may cover areas like local user management or the usage of a client-provided identity management system like Active Directory or an OpenID-provider.
3.2 Using Client-Provided Authentication
The usage of an external authentication may be advisable if a legacy system for authenticating users exists and is not available via any of the supported identity provider interfaces (eg. OpenID Connect) for integration.
With this setup, the Instore Return Center has no access to a user database or any information on the current user of the system, and instead relies on the clients backend system to only provide tokens to authenticated and authorized users. It is the clients responsibility to ensure that only authorized users gain access to an auth-token and thereby to the system.
For this scenario, the client-credentials flow is being used to create a token by a trusted client, which is then used for further access to the Instore Return Center:
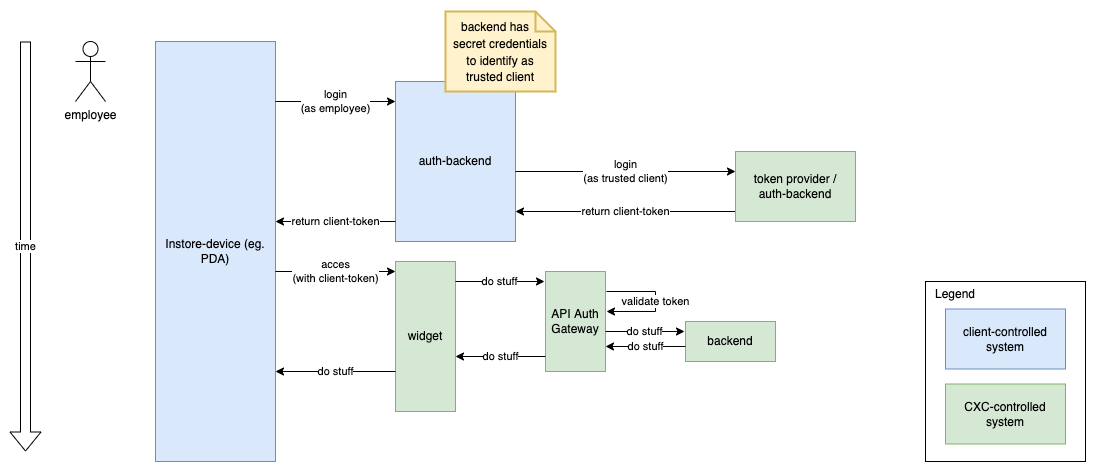
Requesting a token is done by sending an appropriate POST-request to the token provider, like so:
Possible values for AUTHSERVER:
| server name | Description |
|---|---|
| auth.cxc-intg.arvato-scs.digital | integration environment, suitable for tests during/prior to releases |
| auth.cxc.arvato-scs.digital | live / production environment, not suitable for testing |
A set of CLIENT-REALM, CLIENT-ID and CLIENT-SECRET will be provided by the CXC-team for each of the environments individually.
The response to a token request looks something like this:
Please use only the value of the field "access_token" (in the above example this would be
3.2.1 Token Expiry / Validity
- token lifetime (ttl / expiry) will be set on CXC-side according to the specific integration concept
- a
refresh-tokenwill not be issued, refreshing of the token is not supported for security reasons - if a token expires, a completely new token must be requested/issued
- sharing of a token for multiple devices is not advised, albeit technically possible
3.2.2 Token Utilization
To pass the token to the Arvato Instore web component, use the "authtoken" property as shown in the following code snippet:
3.2.3 Authentication Events
The instore widget communicates with your application in the context of authentication by using events.
The following events are thrown by the web component whenever there is a problem with the authentication.
| Event Name | Description |
|---|---|
| auth:invalid | Authentication token is invalid or expired |
| auth:missing | No authentication token has been provided |
You can listen to the mentioned events and react to them accordingly.
3.2.4 Re-Authentication
Whenever the employee needs to re-authenticate (e.g. when the token has expired or no token has been provided) you can pass the new and valid token by throwing an event with the name auth:newtoken. The event should target the Instore Returns Widget, so it can catch it and react accordingly.
Usage:
4. CAMERA REQUIREMENT
The IRC widget will need access to the camera of the device in order to provide all of it's functionality. Therefore you have to make sure that the widget can access the camera by providing the corresponding permissions.
For Android devices you'll have to request permission to use the device camera:
5. LABEL PRINTING
When the employee clicks on the "print label" button, the Instore Returns Widget will throw an event with the name printlabel, which contains
- the label data in format PDF as a byte array
- RMA id of the return
- name of the customer
- a callback, which has to be called after the printing process has been executed
Therefore the event has the following format:
Usage:
Once the printlabel event has been dispatched and the label data been passed to the client application, the IRC widget remains idle. It's the client application's responsibility to handle the label print and to react to potential errors.
The widget proceeds as soon as the client application invokes the finalize callback, which has been provided by the printlabel event.
6. APPENDIX
6.1 Events Overview
This table provides a brief overview over all the events which are thrown (event direction outbound) or caught (event direction inbound) by the widget web component.
| Event Name | Direction | Description | Payload |
|---|---|---|---|
| auth:invalid | outbound | invalid or expired auth token | - |
| auth:missing | outbound | missing authentication token | - |
| auth:newtoken | inbound | provides refreshed auth token | {newToken} |
| printlabel | outbound | trigger for printing pdf label | {labelData, rmaId, customerName, finalize} |
6.2 Troubleshooting
Host Application Cannot Catch Initial Auth Events
Solution: Try to move the event handler registration before the IRC widget gets fully executed and do not register the event handler in async or defer scripts.
Usage example:
Cause: The IRC widget throws the initial events as soon as it gets loaded. These events won't get caught, when asynchronous or deferred scripts are used to register an event handler, because they're possibly executed after the IRC widgets code.